
Introduction
This article shows how to replace a leaking or bad motor mount on your VW Passat, TDI model shown. They will leak red stains from the hydraulic fluid.
The 2 front mounts are hydraulic filled to reduce vibration and increase comfort. They were redesigned to fix leaking problems. The 2 rear mounts are on the transmission and are rubber mounts – they should last a long time. While not technically difficult, you have to support the engine while replacing the mounts. Because of this, I rate it as 3/5 difficulty. For whatever reason, the driver’s side tends to leak more than the passenger side.
If you have an automatic transmission and noticeable vibration at idle, it could also be the CV joints. While stopped put the transmission into neutral, drive, and reverse. If the vibration changes you may have bad CV joints. Also try this test while rolling. If the CV joints make clicking noises when you turn the steering wheel sharply while driving they’re definitely bad. Cheap replacement axles can also cause rattling due to poor build quality.
Parts Required
*Right motor mount: #8d0 199 382 ar
*Left motor mount: #8d0 199 379 ar
*Engine hoist (cherry picker) or engine support bar
*(2 total) front subframe long 18mm bolts: #N 908 235 01
*(4 total) front motor mount bracket shorter 18mm bolts : #N 906 630 02
*Subframe alignment pin : #3393
Example
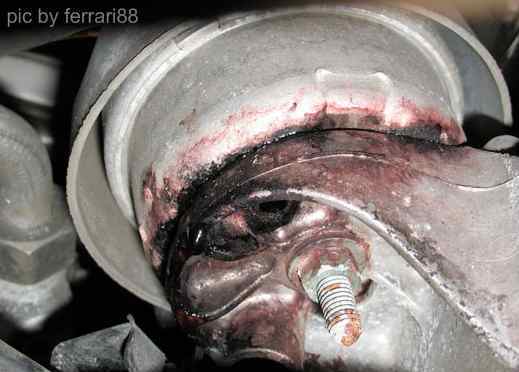
Above is an example of a leaking motor mount. The red stains are the hydraulic fluid inside the mount leaking out. The fluid is greasy, not watery.
Disclaimer
Caution: This procedure requires the engine’s weight to come off the motor mount. You can use a hydraulic jack from below to support or raise the engine but also use a engine support or engine hoist from above as a backup! A hydraulic jack can blow a seal, break, fail, etc., and this can crush your hands or cause other serious injury if the engine moves or the jack slips. Never put yourself into a position where you could be injured because the engine could shift or a jack can suddenly fail. See the TOS Agreement for the full legal disclaimer.
Motor mount replacement procedure
There are two ways to change the motor mount. The first method involves raising the engine while also supporting it from below. The second requires loosening the front subframe to remove the motor mount brackets. Do not lower the subframe unless the engine, transmission, and subframe are supported because they can fall down and cause serious injury or damage if you loosen the bolts too far! If you do remove the motor mount brackets, use the subframe alignment pins to make sure the subframe doesn’t shift.
If you are lowering the subframe for any other reason it’s just a matter of unbolting the 13mm nuts holding the motor mount and removing the mounts.
First rest the car on jack stands at the factory jack points, making sure the car is safe and securely raised before getting under the car. Chock the rear wheels and double check all safety and jack equipment. Remove the splash shield. See 1000q: VW Passat splash shield for more details or replacement fasteners. Below is a picture looking at the front of the engine (front bumper removed for illustration) highlighting the location of the mounts. Also note the snub mount bracket. If you want to replace the snub mount, first mark the original position of the bolt holes with some paint and then remove the bracket to get the mount out.
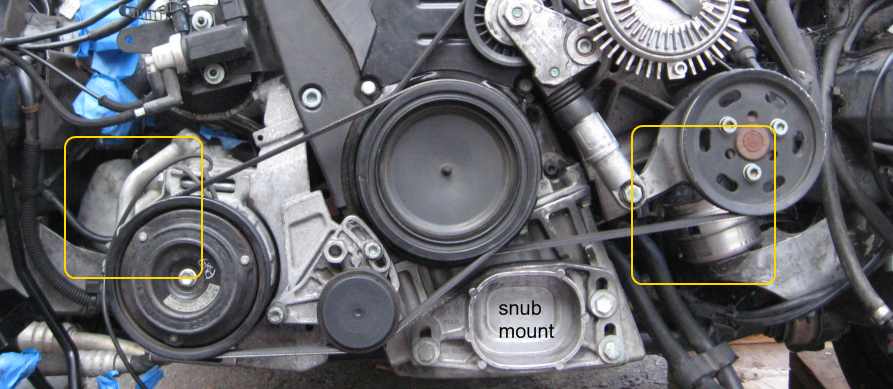
Place a wide, flat piece of wood between a hydraulic jack and the aluminum oil pan to raise the engine. Do not place a jack directly on the oil pan or use a small piece of wood because it can crack the soft metal!
As seen in the introduction, there is a 13mm nut holding a cable bracket on the driver’s side. Remove it and the 13mm nut under it holding the mount. Also remove the 13mm nut and power steering line holder on top of the driver’s side mount (highlighted below, some items removed for illustration).
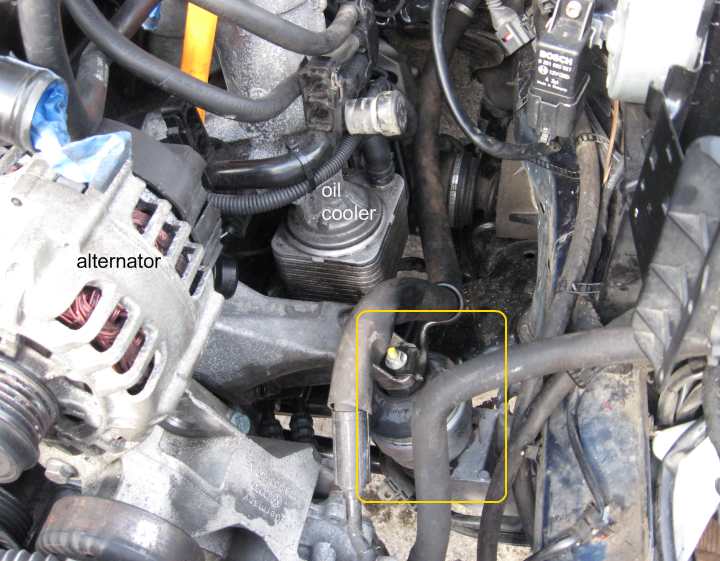
The long studs will prevent removal of the mount without raising the engine or lowering the subframe or both. If you have an engine hoist and are replacing both front motor mounts, you can slightly raise the engine using the hoist and hydraulic jack and remove the mounts. If you have an engine support bar, you can use the screws to raise the front of the engine to and support it as a backup. Follow the instructions on your engine hoist or engine support for details on their use. Again, use a backup just in case the engine slips or your jack slips or fails.
If you can’t raise the engine far enough you have to lower or remove the aluminum motor mount bracket. This is more dangerous because if your jack fails or the engine slips, it could fall down to the side without the mount – do not put your hands in a position where they could be crushed if the engine moves! Again, note the caution above: you can use a hydraulic jack from below to support or raise the engine but use a engine support or engine hoist from above as a backup! A hydraulic jack can blow a seal, break, fail, etc., and this can crush your hands or cause other serious injury if the engine moves or the jack slips
Motor mount bracket removal/lowering
If you must remove or lower the motor mount bracket for clearance, first note the 3 alignment holes on the car frame rail, subframe, and motor mount bracket. Below is a picture with the wheel, plastic wheel well liner, and bumper removed for illustration. The subframe alignment pin VW tool# 3393 fits through the holes and rests in place. It should easily slide in and out easily and rest in a vertical position. If you only loosen one corner at a time it shouldn’t go out of alignment but no guarantees. You should at least use a socket of the correct diameter as a substitute for the VW tool to check alignment.
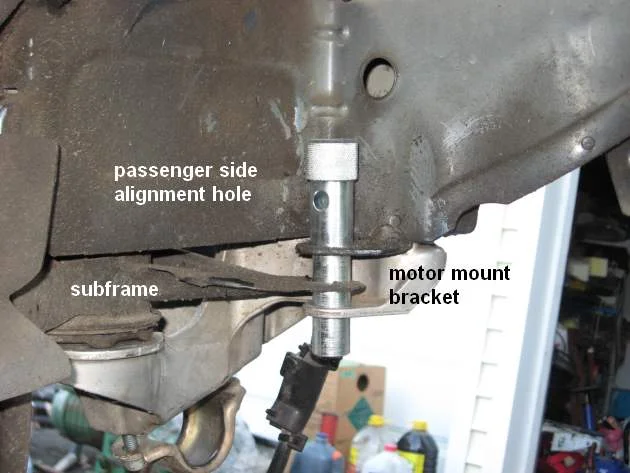
Here is a view from below, looking up at the bracket with the wheel, etc., in place. The holes should line up (the picture was taken slightly off center). If they aren’t then the subframe is crooked. If they are perfectly lined up and the tool goes in and out the same as before, you won’t need a wheel alignment (the suspension is connected to the subframe – loosening the front subframe can shift the suspension and throw off the wheel alignment).
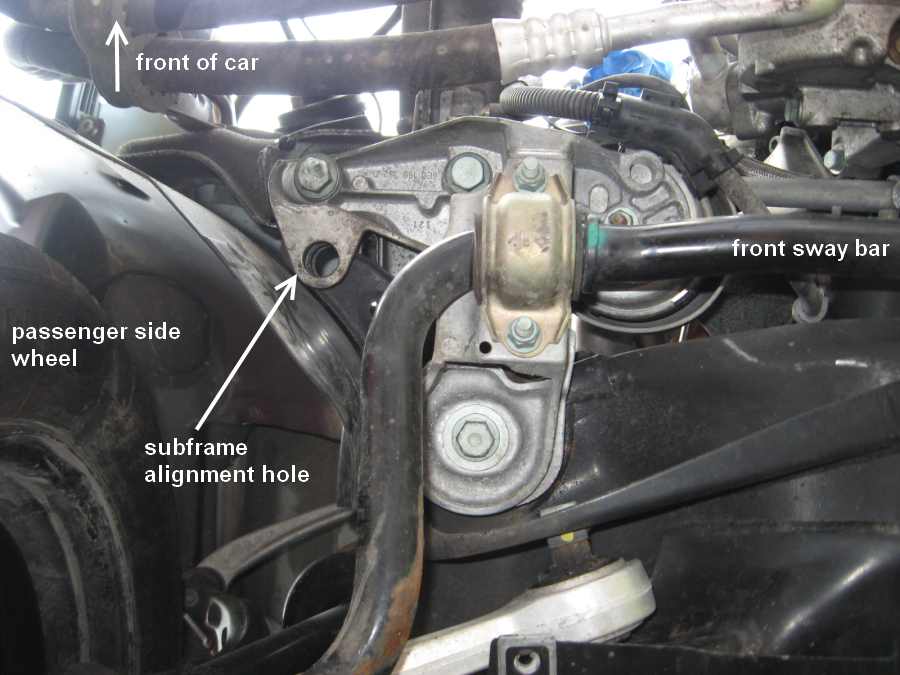
First disconnect the 2x 13mm sway bar bracket nuts. Again, the engine must be supported before loosening the motor mount bracket bolts or subframe bolt! Only do 1 corner at a time to prevent the subframe from shifting!
Then loosen the 2x 18mm motor mount bracket bolts and the 18mm long subframe bolt. Loosen them all by a single turn before removing any of them. This helps avoid stressing the threads. The 2x 18mm bracket bolts will probably have to come out. The 1x 18mm long subframe bolt is long enough so that you probably don’t have to remove it if the engine is raised a little for clearance. You should be able to raise the engine and lower the mount bracket enough to get the mount out.